
checksec으로 보호기법 확인

보호기법이 전부 적용되어 있다.
###
참고로 docker파일에 pwngdb를 설치하는 코드를 함께 추가하여
docker 내에서 디버깅을 실시하였다.
문제 코드
// Name: uaf_overwrite.c
// Compile: gcc -o uaf_overwrite uaf_overwrite.c
#include <stdio.h>
#include <stdlib.h>
#include <string.h>
#include <unistd.h>

struct Human {
  char name[16];
  int weight;
  long age;
};

struct Robot {
  char name[16];
  int weight;
  void (*fptr)();
};

struct Human *human;
struct Robot *robot;
char *custom[10];
int c_idx;

void print_name() { printf("Name: %s\n", robot->name); }

void menu() {
  printf("1. Human\n");
  printf("2. Robot\n");
  printf("3. Custom\n");
  printf("> ");
}

void human_func() {
  int sel;
  human = (struct Human *)malloc(sizeof(struct Human));

  strcpy(human->name, "Human");
  printf("Human Weight: ");
  scanf("%d", &human->weight);

  printf("Human Age: ");
  scanf("%ld", &human->age);

  free(human);
}

void robot_func() {
  int sel;
  robot = (struct Robot *)malloc(sizeof(struct Robot));

  strcpy(robot->name, "Robot");
  printf("Robot Weight: ");
  scanf("%d", &robot->weight);

  if (robot->fptr)
    robot->fptr();
  else
    robot->fptr = print_name;

  robot->fptr(robot);

  free(robot);
}

int custom_func() {
  unsigned int size;
  unsigned int idx;
  if (c_idx > 9) {
    printf("Custom FULL!!\n");
    return 0;
  }

  printf("Size: ");
  scanf("%d", &size);

  if (size >= 0x100) {
    custom[c_idx] = malloc(size);
    printf("Data: ");
    read(0, custom[c_idx], size - 1);

    printf("Data: %s\n", custom[c_idx]);

    printf("Free idx: ");
    scanf("%d", &idx);

    if (idx < 10 && custom[idx]) {
      free(custom[idx]);
      custom[idx] = NULL;
    }
  }

  c_idx++;
}

int main() {
  int idx;
  char *ptr;

  setvbuf(stdin, 0, 2, 0);
  setvbuf(stdout, 0, 2, 0);

  while (1) {
    menu();
    scanf("%d", &idx);
    switch (idx) {
      case 1:
        human_func();
        break;
      case 2:
        robot_func();
        break;
      case 3:
        custom_func();
        break;
    }
  }
}
문제를 풀면서 처음으로 이렇게 긴 코드를 본것같다
코드를 보면 human, robot의 구조체 크기가 같다. 이때 초기화 과정이 없는 것을 볼 수 있다.
그렇다면 human에 메모리 할당 후에 robot에 메모리를 할당한다면 uaf를 사용할 수 있다.
robot_func 함수를 보면 fptr 포인터 변수가 NULL이 아닐때 변수를 호출한다
그렇다면 uaf로 fptr에 hook 또는 one_gadget를 넣는다면 flag를 얻을 수 있겠다
보호기법을 보면 libc의 주소를 얻어야 한다
custom함수를 보면 0x100이상 메모리를 할당하고 해제하는 과정에서 uaf를 사용할 수 있다
custom함수를 통해 libc 주소를 알아내겠다.
문제 풀이 과정
1. libc 주소 구하기
2. 원가젯 구하기
3. payload 작성
4. 실행
1. libc 주소 구하기
heap 영역을 확인해 구하는 것이기 때문에 custom 함수에서
메모리를 할당하고 해제된 메모리를 재할당해 값을 읽어야 한다
메모리 할당 과정

2개의 청크를 할당하고 1번째 청크를 해제하였다.
heap, vmmap 확인
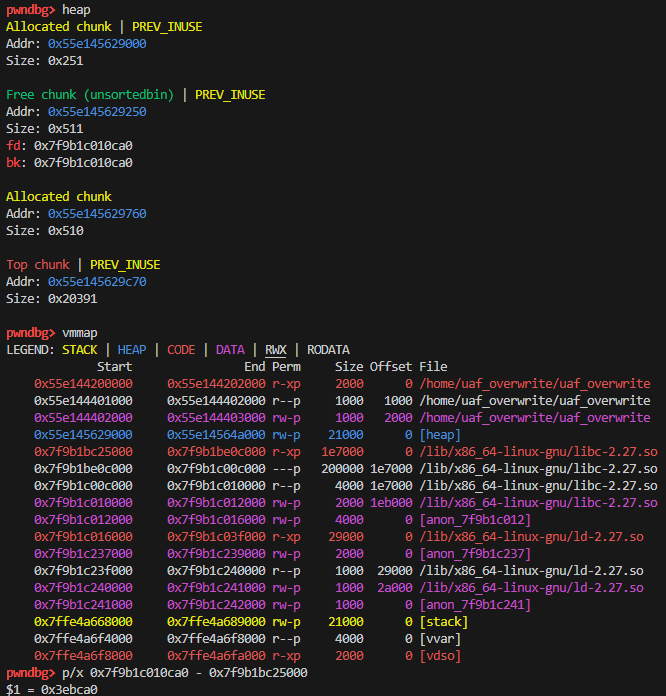
heap에 fd값을 vmmap으로 확인해 보면 libc영역임을 알 수 있다.
따라서 libc 베이스 주소와 fd값을 빼면 offset 값인 0x3ebca0값을 구할 수 있다.
2. 원가젯 구하기
one_gadget libc-2.27.so

3. payload 작성

lib_base를 구하는 과정에서 0x3ebca0를 사용하지 않고 0x3ebc42를 넣는 이유는 B값을 넣을 때
B값인 42로 뒤에 덮어씌워지기 때문이다.
4. 실행

풀이 실패 과정
1. libc 주소를 구하는 과정 자체는 전에 들었던 강의와 같았지만
docker를 사용하지 않고 주소를 구하니 값이 달라져서 문제가 풀리지 않았다.
2. libc를 구하는 과정에서 재할당하여 구할 때
들어간 값이 덮어씌워지는 것을 생각하지 않아서 문제가 생겼다.
'시스템해킹' 카테고리의 다른 글
| [드림핵] tcache_dup 풀이 (0) | 2024.07.14 |
|---|---|
| [드림핵] Tcache Poisoning 풀이 (2) | 2024.07.14 |
| [드림핵] basic_exploitation_003 풀이 (0) | 2024.05.27 |
| [드림핵] basic_exploitation_002 풀이 (0) | 2024.05.27 |
| [드림핵] Format String Bug 풀이 (0) | 2024.05.27 |


